Deploying High Availability CDN Architecture on AWS Using AWS CLI
This blog aims to implement the webserver high availability architecture on AWS using AWS CLI. Furthermore, additional EBS storage will be used to make the architecture permanent/highly available, S3 service will be used to store the static objects for the Webserver. Moreover, CloudFront will be used for CDN services.

Considering any business, high availability is the core requirement, irrespective of the type of business, if the business has to grow, then it has to be available, otherwise business can not grow if the business products are not available.
Also, in addition to availability, there is one more factor that is “how fast the services of the business can be accessed?”, this factor also plays a very important role in business growth in today’s rapid world.
For example, consider online e-commerce company “Flipkart”, if the site of Flipkart is not available then, then Flipkart can not grow, moreover it will vanish from the e-commerce market in few weeks even because it is not available. Now, coming to the speed of availability of the services of Flipkart, consider a case in which the site of Flipkart takes too much time to load, in this case even, Flipkart’s customers will stop accessing the website because they will be irritated/annoyed with this latency in the website loading.
Therefore, it can be concluded that to have a highly available business architecture in combination with low latency in the service accessibility is very much important. This blog will explain the process of creating the same architecture using a very basic example on top of AWS Cloud.
Architecture to be covered by this blog!
- Creating an AWS EC2 instance.
- Configuring the Webserver in the launched EC2 Instance.
- Making the Webserver documents/content persistent.
- Creating an object storage S3 bucket for the static content of the website.
- Storing the static objects related to the business in the object storage S3.
- Creating a CDN (Content Delivery Network) using AWS CloudFront(to make services available at a low latency across the globe).
- Integrating Website & the CloudFront URLs.
Note: Complete architecture will be set up using AWS CLI. Also, I am considering that the readers of this blog are comfortable with the AWS basic services.
Creating an AWS EC2 instance!
Run the below-given command to start an EC2 instance on AWS. (Tune the command parameters according to your requirement).
aws ec2 run-instances --image-id <AWS AMIID> --key-name <Name of the Key to be attached with the EC2 Instance> --instance-type <Instance type to be used> --security-groups <Name of the security groups to be attached to the Instance> --tag-specifications 'ResourceType=instance,Tags=[{Key=Name,Value=CLI-EC2-Instance}]'
Note: Launch the instance using either RedHat OS or Amazon OS if you want to use the exact commands shown in this blog, otherwise if you use any other OS, then you have to use the commands supported by that OS to follow along this blog.
Configuring the Webserver in the launched EC2 Instance!
Apache Webserver is used for this practical/project. To configure the webserver, login to the EC2 instance which is created & follow the below-mentioned steps:
- Install the Webserver
Run the command highlighted in the image to install the webserver.


2. Running the Webserver services & enabling them to start every time at the time of OS boots up.

Making the Webserver documents/content persistent!
When the above step(installing webserver) is complete, by default the directory “/var/www/html” will be created.
In order to make the files for the webserver persistent i.e. to make the directory “/var/www/html” persistent, additional storage has to be linked/mounted to the directory.
To create the additional EBS storage on AWS, follow the below steps:
- Creating an EBS Storage.
Run the below-given command according to your need:
aws ec2 create-volume --size <size in Gib> --availability-zone <availability zone in which the instance is running to which this volume has to be attached>2. Attach the volume to the instance
Run the below-given command:
aws ec2 attach-volume --volume-id <volume id of the external EBS volume created> --instance-id <Instance Id to which the volume has to be attached> --device <device name for the EBS volume by which it will be attached>3. Create partitions in the drive
After the drive is attached to the EC2 instance, partitions have to be created inside that, so that it can store the data.
Create the partitions by “fdisk -l” command or any other preferred way.
4. Format the partitions
Once, the partition is created, it has to be formatted to store the data.
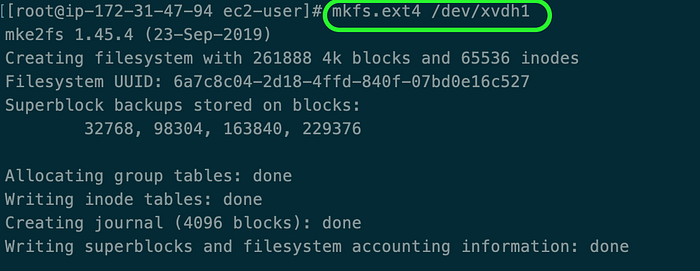
Note: in the above-given command, write your partition name instead of the above-mentioned one in the image, because there is a high chance that your partition name may vary.
5. Mount the partition to the Webserver Document Root
To mount the partition, run the below-given command:
mount <partition name> /var/www/htmlCreating an object storage S3 bucket for the static content of the website!
To create the S3 bucket for the static content, run the below-mentioned command:
aws s3api create-bucket --bucket <unique bucket name for the complete region> --region <region name>Note: If you are creating the bucket in the ap-south-1 region, then the above command will be changed to:
aws s3api create-bucket --bucket <unique bucket name for the complete region> --region ap-south-1 --create-bucket-configuration LocationConstraint=ap-south-1Storing the static objects related to the business in the object storage S3!
Run the below-given command to upload the objects to the S3 bucket created in the above step:
aws s3 cp <path of the file to be upload> s3://<bucket name in which the file has to be uplaoded> --acl <your preferred-acl for example 'public-read-write'>Creating a CDN using AWS CloudFront!
Run the below command to create a CDN service using AWS Cloudfront:
aws cloudfront create-distribution --origin-domain-name <s3 bucket name>.s3.amazonaws.com --default-root-object <object name in the bucket to which the cloudfront url will point by default> Integrating Website & the CloudFront URLs!
In your webpage file, add the CloudFront URLs so that can be loaded quickly on the website. For example, a sample code of the webpage displaying an image using CloudFront URL & some text could be like:

The above code has to be created inside the document root of the webserver i.e. “/var/www/html”.
Now, when the webserver service is been requested, the above code will show the output as:

I hope my article explains each and everything related to the topic with all the deep concepts and explanations. Thank you so much for investing your time in reading my blog & boosting your knowledge. If you like my work, then I request you to give an applaud to this blog!

